TANGIBLE Guide to Adobe Essential Graphics Templates
v0.1
Updated: Summer 2023
Understanding .mogrt & .aegraphic Files
Adobe Motion Graphic Templates are an easy way to incorporate animated graphics into your productions.
They are packaged and stored in two interrelated files: a .mogrt file and an .aegraphic file.
• The .mogrt is the file you will receive when you download a template from the TANGIBLE website. The .mogrt is a package file, almost like a .zip file. It is the “box” that the .aegraphic comes in.
• The .aegraphic contains the actual graphics, and is kind of like a mini After Effects file that Premiere can read.
.aegraphic
.mogrt
The .mogrt is used for storing and browsing templates, and it can live anywhere on your hard drive or external disk. It allows you to import the Motion Graphics Template to your Essential Graphics library in Premiere.
Once you place a template into your editing timeline, Premiere unpacks the .mogrt. It then creates a copy of the contained .aegraphic on your hard drive, according to your Motion Graphic Template Scratch Disk settings.
Note:
You’ll notice that if you search for the filepath of a Motion Graphics Template you are using in your Premiere project, it will point not to the original .mogrt, but to a new .aegraphic file. The location of this file will depend on your Motion Graphic Template Scratch Disk settings within your Premiere project.
IMPORTANT: If you are sharing your Premiere project across multiple devices, and you want to manage your linked media — it’s the .aegraphic file that really counts. That’s the file that Premiere actually uses in your project.
Why are there two separate files? Why not just have an .aegraphic file without the .mogrt? These are questions for Adobe. And there are probably good complicated computer-y reasons for this. But all we need to know is that the .mogrt is the format that the Essential Graphics panel understands. And it’s still the best way to set up Motion Graphics Templates in your project.
Importing .mogrts
When you download a Motion Graphic Template from the TANGIBLE Store, it will come as a .mogrt file.
To use a Motion Graphics Template in your production, import the .mogrt file into Premiere. For more information, visit Adobe’s official guide on how to install and use Motion Graphics templates.
1. In the menu bar, go to Window > Essential Graphics to open the Essential Graphics panel.

2. At the bottom-right of the Essential Graphics panel, click the plus button. Navigate to the location of the .mogrt you want to import, then click Open.

3. You can also drag and drop multiple Motion Graphics templates directly from Finder into the Browse tab of the Essential Graphics panel.

Working with Motion Graphic Templates
Adding Motion Graphic Templates to your timeline
In the Essential Graphics panel, search or browse to the template you want to use.

Drag and drop the template from the Essential Graphics panel into your timeline.

Editing Motion Graphics Templates
You can edit the template using the Edit tab of the Essential Graphics panel.

Depending on the specifics of the template, the fields available for editing will vary. But there are a few standard types of editable features.
Text
Editable text will be displayed in a text entry field. You can edit the text here, and it will update in your graphics.

Some templates may include the option to select your own font, adjust the font size, and other text parameters.

Checkbox Control
Like any standard checkbox, properties with a Checkbox Control will allow you to toggle between two states.

Dropdown Menu
Like any standard dropdown menu, properties with a Dropdown Menu will allow you to select an option from a predefined list.

Slider Control
Sliders allow you to select a numerical value for a property. Sliders have predefined upper and lower limits that you will not be able to exceed.

Color Selector
The color selector allows you to customize colors of specified properties.

Drop media
The drop media field allows you to add your own media to a Motion Graphics Template.

Adding Media
You can add media to your template by dragging and dropping from the project panel to the media area in the Essential Graphics panel.


Once you add your media, it will appear in the Essential Graphics panel, as well as within the template in your Program Monitor.
In this example, the template can hold an image within a 800 x 800 square region.
Scale Dropdown Menu
Scale to fill
This will take it to the edges of the bounding box and may result in cropping.
Scale to fit
This will make the object as large as it can be within the bounding box without cropping.
Stretch to fill
This will make it as large as it can be in both dimensions and will change the proportions to do so.
No Scale
Will remain at its original size, and may result in cropping.
Additional Scale Options
Manual Scale
Scales from the center of the box.
Set Scale Lock
Allows you to set independent X and Y scale.
Manual Position
Position within the box. Values beyond the box may result in cropping or the image disappearing entirely.
Manual Rotation
Rotates from the center of the box. If Manual Position has been changed, it will still rotate around the center of the Object Box rather than the center of the Drop Media.
Special Features
In Point
If your footage is time-based media (i.e. if you are dropping in a movie file, rather than a still image), you can adjust the time offset by dragging this value.
Open in Timeline
This is an incredibly useful and often-overlooked feature of Essential Graphics templates. By clicking the hamburger menu at the top-right of the Object panel, you can access several options, including Open in Timeline.


Selecting Open in Timeline will open a temporary sequence that allows you to edit the footage within the template. You can also add audio and video tracks, and add other items of footage or images and cut them as needed.

Troubleshooting
For hobbyists or semi-professional productions, it may be enough to leave the under-the-hood settings for your Motion Graphics Template Media as they are by default.
However, for professional productions where media storage and organization is of paramount importance, there are a few special attributes of Motion Graphics Templates that may require special attention.
Media Storage and Organization
By default, Motion Graphics Templates are stored in your local directory’s documents folder.
This may cause media to go offline in situations where work is being done on different workstations, or where an external drive or server is used for storing project media.
There are a few ways to manage media to prevent or remedy these issues.
Getting the Right Settings at the Start of Your Project
The best way to ensure your project’s flexibility across multiple workstations is to set your Motion Graphics Template Media Scratch Disk at the start of your project, before you import any Motion Graphics Templates.
This can be done in the Project Settings window (File > Project Settings > Scratch Disks…).
In the Scratch Disk settings, find the settings for Motion Graphics Template Media, and click Browse… to navigate to a location on an external drive. This will ensure that when you import a .mogrt, it will place the unpackaged .aegraphic file at the proper location on the external drive.

Once your Scratch Disk settings are set, you can import .mogrts and they will automatically unpack the .aegraphic file to your chosen destination. This means you can switch workstations and share drives, and all your media will remain online.
Fixing “Media Offline” Warnings for Previously Imported Motion Graphics Templates
If you are working with Motion Graphics Templates in a project that was originally created on another workstation, you may encounter a Media Offline warning for your templates.
The process for fixing offline Motion Graphics Templates is different from the normal process for relinking footage.
This is because Motion Graphics Templates are not just simple footage. They may have modified properties (such as text changes, color selections, and other modified template settings) that are unique to each instance of the template. For example:
Let’s say you’re working on a documentary with several interview subjects, and you have a Motion Graphics Template for lower thirds. That template is already in place with all the names and titles of the interview subjects — but the media is offline. What do you do?
It might appear that you have to start all over by re-importing the .mogrt, and individually adding the text for each interview subject. But there is a better way!
If the template objects in your timeline contain modified properties, there are a few steps you will need to follow in order to preserve the existing attributes of the template.
Understanding how Premiere Handles Motion Graphics Templates:
Unlike most other footage types, Motion Graphics Templates do not link to the original .mogrt that you imported. They link to the unpackaged .aegraphic file that is created at the time of import, which is then stored at the project’s Motion Graphics Template Media Scratch Disk location.
Before relinking, you must locate the .aegraphic file for your template.
If You Have Access to the .aegraphic File
You may already have the .aegraphic file stored on your computer or connected drive. If you have access to the .aegraphic file, first move it to the appropriate location on your media drive. Then follow steps 1-4 below:
If You Do Not Have Access to the .aegraphic File
If you do not have access to the .aegraphic file, you will need to re-import the original .mogrt. You can then locate the new .aegraphic file it creates upon import. You can do this according to the following steps:
1. With your Scratch Disk set to the appropriate location, import your .mogrt using the usual method, as described in the Importing .mogrts section above. This will place a working, online copy of the Motion Graphics Template in your project panel.
2. Locate the Motion Graphics Template in your project panel. Right click on it and select Reveal in Finder… .
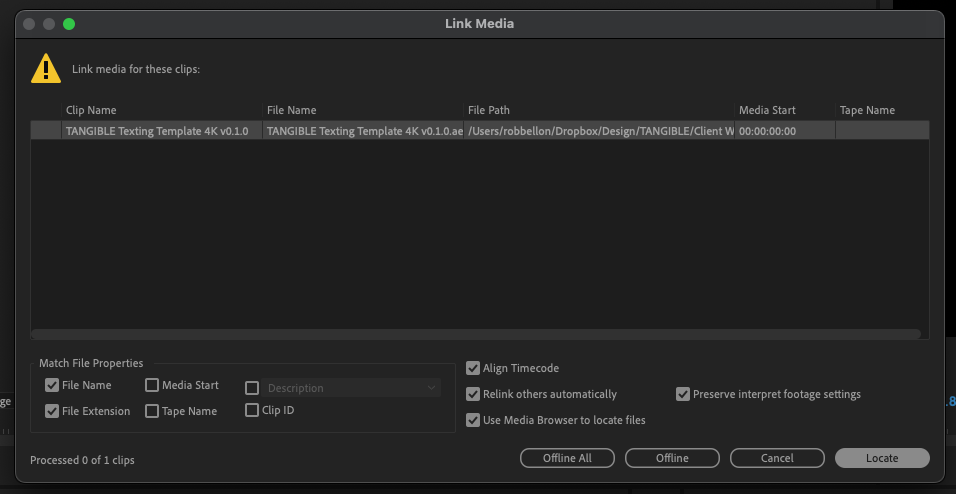
3. Now locate the offline Motion Graphics Template in your project panel. It will be indicated by a piece of footage with a broken link symbol. Right click on it and select Link Media… .

4. Browse to the newly stored .aegraphic you imported in Steps 1 & 2 above. Select the .aegraphic file, and click Locate.Note: It’s important to link to the .aegraphic and not the .mogrt. Trying to link to the .mogrt will not work.

Your template will now be connected, and all your previous settings and customizations will be preserved.
Further Reading
There’s no better place to look than the source. Adobe’s guide on how to Install and Use Motion Graphics templates is the go-to resource for all things .mogrt.
Chris Salter’s article on Frame.io, The Premiere Pro Editor’s Guide to Using the Essential Graphics Panel, covers everything in this guide and more. It includes video examples, and it’s a great resource for any Premiere editor looking to incorporate Motion Graphics Templates into their workflow.